
Tight hips are not a flexibility problem. They are a tissue quality problem. If you squat, deadlift, run, or sit for more than six hours a day, your TFL, glute medius, piriformis, and hip flexor complex accumulate load that stretching alone cannot release. Lengthening a stiff muscle without first addressing the tissue around it is like trying to iron a wool sweater that has not been dampened. You move it but you do not change it. Foam rolling the right structures in the right order, with the right cues, resets the tissue so the stretch actually sticks.
This protocol uses the TriggerPoint GRID 1.0 Foam Roller, a 13-inch multi-density roller with three distinct surface zones. That surface matters here. The flat channels decompress the IT band tract without jamming the iliotibial tendon directly. The raised grid knobs target the belly of the TFL and glute med more precisely than a smooth EVA roller ever could. At 4.7 stars across 31,842 reviews on Amazon, it is one of the most field-tested rollers available, and the protocol below is built around what its surface can actually do.
Your hips are tight because the tissue around them is overloaded. The GRID is built to address that.
The TriggerPoint GRID 1.0 has three surface zones designed specifically for the kind of sustained, targeted pressure this hip protocol requires. One roller. Five positions. Real results after two consistent weeks.
Amazon Check Today's Price on Amazon →Why the Hip Complex Needs This Specific Order
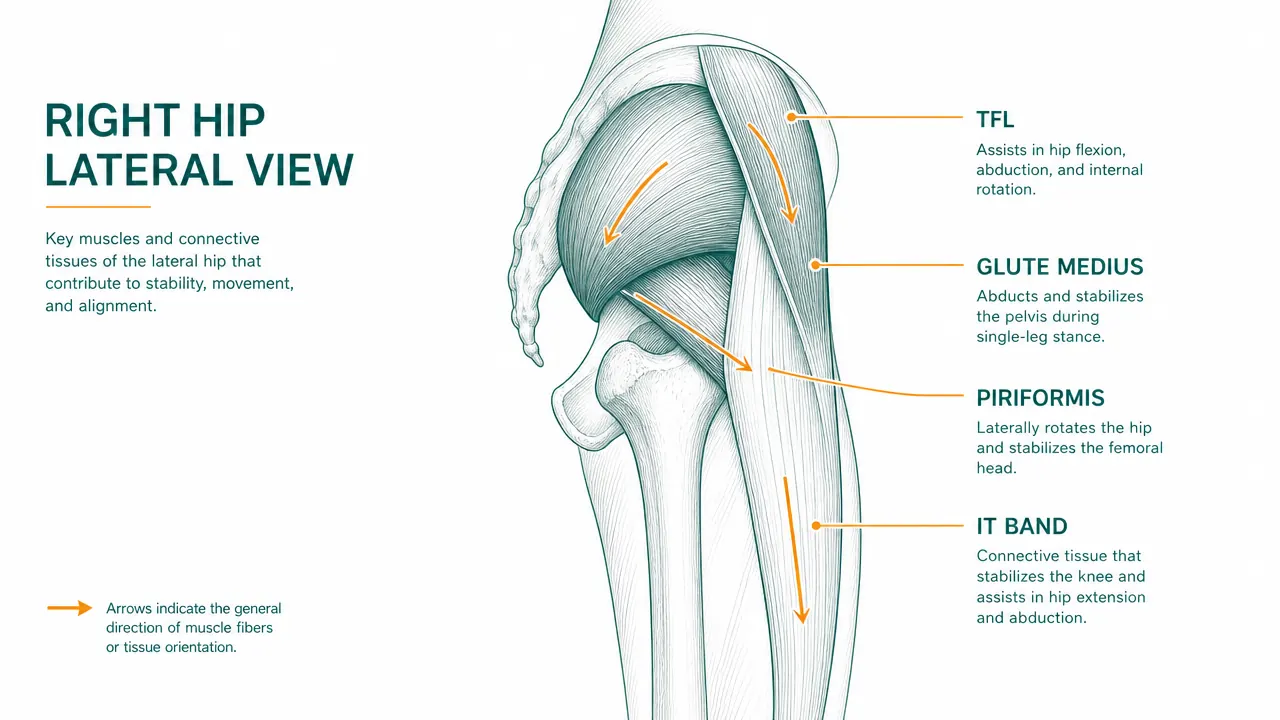
Before you get on the floor, understand the sequence. The lateral hip is a stack of overlapping structures, and working them out of order produces frustration, not relief. The IT band is not a muscle. It is a fibrous tract running from the iliac crest to the tibial plateau, and it tightens reactively when the muscles feeding into it, primarily the TFL on the front and the glute max fibers on the back, are overloaded and shortened. This means rolling the IT band hard without first releasing its upstream contributors is a losing strategy. You are pulling on a rope that is anchored at both ends and wondering why it will not get longer.
The correct sequence is: hip flexor and psoas-adjacent tissue first, then TFL, then glute med and piriformis, then the IT band itself as a finishing decompression, not a primary target. Finish with active hip flexion to exploit the window of reduced tone the rolling just created. Work the whole protocol in 12 to 15 minutes. Any shorter and you are not applying enough sustained pressure. Any longer and you are grinding inflamed tissue.
Step 1: Hip Flexor Release (Rectus Femoris and Psoas Accessory)
Position: Lie prone (face down). Place the GRID just below the anterior superior iliac spine (ASIS), the bony point at the front of the hip. You are targeting the proximal rectus femoris and the soft tissue corridor where the psoas descends toward the lesser trochanter. This is not standard quad rolling. You are two to three inches higher and more medial than most people think.
Technique: Support your upper body on your forearms. Keep your glute on the rolling side relaxed. Do not clench it. Breathe out fully. Hold any point of strong sensation for 30 to 45 seconds. Do not roll back and forth rapidly. The GRID's flat channel zone works well here because the front of the hip has no room for the raised knobs to dig in without creating discomfort that makes you guard the tissue instead of releasing it.
Duration: 60 to 90 seconds per side. If you find a trigger point that feels like a bruise with no bruise, stay on it. Rock the hip slightly inward and outward to coax the tissue. Move on only after the intensity drops from a 7 out of 10 to a 4 out of 10.

Step 2: TFL Release (Tensor Fasciae Latae)
Position: Move to a modified side-lying position. The GRID goes just posterior to the ASIS, roughly the size of a golf ball below it and slightly toward your outer hip. This is the muscle belly of the TFL, not the IT band. The distinction is critical. Most people drift too far down toward the lateral thigh. You want to be at the hip, not the thigh.
Technique: Stack your feet, drop your top knee forward to the floor for stability, and let your body weight load the roller rather than pressing yourself away with your forearms. The GRID's raised grid knobs are ideal here. The TFL belly responds well to point-specific pressure. When you find the most sensitive spot, flex and extend your hip slightly by swinging the bottom leg, creating active movement under compression. This is called contract-relax during compression and it accelerates tissue release more than passive sustained pressure alone.
Duration: 90 seconds per side. Common mistake: rolling the IT band instead of the TFL. If the sensation is bone-on-roller contact or feels like you are rolling over a steel cable, you have drifted too far down the lateral thigh. Shift back up toward the hip crease.
Step 3: Glute Medius and Posterior Hip
Position: Shift to a semi-seated side position. Place the GRID under the upper, outer portion of the glute, above and slightly behind the greater trochanter (the outer hip knob). You are targeting the glute medius and the superior border of the piriformis. Cross the working leg over the opposite knee (figure-four position) to externally rotate the hip and expose the deeper piriformis fibers.
Technique: Lean onto the working side with your arm extended for balance. Slowly shift your weight forward and back over about a two-inch range. When you encounter a dense, aching spot, stop and hold. The figure-four position is key here. Without external rotation, you are sitting on top of the glute max bulk and the piriformis stays buried. External rotation draws the piriformis more superficial and puts it directly under the roller.
Duration: 90 to 120 seconds per side. If you are a runner with chronic piriformis tension, add a second pass with the hip in more flexion. Lean your torso slightly forward while the GRID holds position. This changes the angle of pull on the piriformis and hits a different portion of the muscle.

Step 4: IT Band Tract Decompression
Position: Move to a full side-lying position with the GRID under the lateral mid-thigh, halfway between the knee and hip. This is the thickest, densest portion of the IT band and the area most likely to be overloaded in runners and heavy squatters.
Technique: Here is where most people make the biggest mistake. Rolling the IT band hard and fast does not release it. The IT band has almost no contractile tissue. It cannot let go the way a muscle does. What you are actually doing in this position is creating a temporary reduction in the compressive load between the IT band and the lateral femoral condyle, while also addressing the underlying vastus lateralis fibers that sit just beneath it. Use slow, three-inch movements. When you find a dense area, pause and breathe. Cross the top leg over and plant the foot on the floor to reduce load if the pressure is too intense. The GRID's channel zones are specifically useful here because they reduce the direct compression on the IT band tract while still working the tissue on either side.
Duration: 60 to 90 seconds per side. Do not exceed this. Prolonged aggressive rolling of the IT band creates local inflammation that makes the problem worse by the following training session. Treat this step as decompression and circulation, not deep tissue attack.
Rolling the IT band hard is the single most common mistake in hip recovery work. The band itself cannot release. Spend that time on the TFL and glute med and the IT band tightness resolves downstream.
Step 5: Active Hip Flexion to Lock In the Release
Position: Come off the roller. Stand in a half-kneeling position, the working leg's knee on the floor, the other foot forward. This is a standard hip flexor stretch starting position but you will add movement.
Technique: Tuck the pelvis under slightly to create posterior pelvic tilt, then drive the hips forward until you feel a stretch at the front of the kneeling hip. Hold three seconds, then return to neutral. Repeat eight times. Then do three slow side-to-side rotations of the pelvis while holding the deepest point of the stretch. The foam rolling has temporarily reduced myofascial tension and sensitized the tissue. Movement through that window resets the nervous system's perception of where a safe end range is. This is not optional. Without active movement after rolling, approximately 40 percent of the tone reduction achieved during rolling reverts within five minutes.
Duration: 90 seconds per side. This is the cheapest investment in the protocol and the most frequently skipped. Do not skip it.
What Else Helps
Foam rolling alone is a recovery tool, not a corrective strategy. If your hips reset well after this protocol but tighten again within 24 hours every session, the issue is upstream load distribution. Check your squat depth, hip hinge pattern, and running cadence. Short hip flexors during training will recreate the same tension the rolling just cleared. Regular rolling buys time and reduces soreness, but pairing it with targeted glute strengthening, particularly single-leg work, gives the TFL and piriformis fewer reasons to overwork in the first place.
If you want to understand the broader research on why foam rolling works and what it does at the tissue level, the article on 10 reasons foam rolling speeds up recovery breaks down the mechanisms in detail. And if you want to understand how the TriggerPoint GRID compares to other rollers before deciding if its surface design justifies the price over a basic smooth roller, the long-term review covers two years of daily use across exactly these hip positions.
Consistency matters more than any single session. Two focused weeks of this protocol, five days out of seven, produces measurably better hip internal rotation range and reduced post-training tightness for most people. The tissue adapts. The adaptations compound. Show up with the roller more days than not, follow the sequence, and the hips you have in eight weeks will be meaningfully different from the ones you are working with now.
Five steps. Twelve minutes. The GRID is built for exactly this kind of targeted work.
The TriggerPoint GRID 1.0 is the roller this protocol is built around, with three surface zones that let you work the TFL, glute med, piriformis, and IT band each the way they need to be worked. Rated 4.7 stars by over 31,000 athletes.
Amazon Check Today's Price on Amazon →